FB60 in SAP: How to Create a Vendor Invoice
Till now, I have explained the processes of how to create a customer invoice using tcode FB70 in SAP and then clearing this open item by receiving an incoming payment from the customer. Today, I will be covering the tutorial on how to create a vendor invoice using tcode FB60 in SAP. Alternatively, you can use tcode MIRO in SAP to create a vendor invoice via Purchase Order.
A vendor is someone from whom we purchase the goods. Once we receive the goods, we need to pay the outstanding amount to the vendor. For this purpose, you create a vendor invoice in SAP.
In SAP, there are three ways to generate a vendor invoice. If you follow the route of a purchase order, then this complete process can be run in the SAP MM module. You create a purchase order in SAP MM and then receive the inventory from the vendor. After that, you create a vendor invoice using tcode MIRO in SAP.
But how to create a vendor invoice in SAP FICO? There are actually two ways to do it in SAP FI. It’s simple, you just need to run either the transaction code FB60 or FB01 in the SAP command field and enter the vendor details.
FB01 in SAP is used for posting a generic journal entry in SAP. It is the background transaction of the F-02 tcode. So without any further delay, let’s start our tutorial on how to create a vendor invoice in SAP via transaction FB60.
Table of Contents
Step 1: Execute Tcode FB60 in SAP
The first step is to execute the tcode FB60 by entering it in the SAP command field. The other way around to access this transaction is by following the SAP path given below.
| SAP Path | SAP Menu -> Accounting -> Financial Accounting -> Accounts Payable -> Document Entry -> FB60 Invoice |
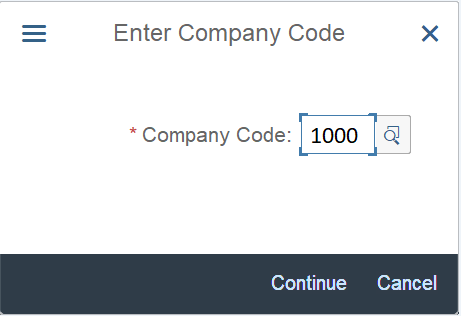
After executing this transaction, the system will show a company code pop-up. You need to enter the company code for which you want to create a vendor invoice. For example, I’m using a company code 1000 for this purpose.
Step 2: Enter the Header Data
After entering the company code, you will be shown the main input screen of FB60 (also known as Enjoy Transaction). At the top, there is a drop-drop menu in the Transaction field. By default, the system will assign ‘Invoice’ as this tcode is widely used for posting vendor invoices.
But, you can also choose other options. For example, if you want to create a vendor credit memo, then you can select the Credit Memo option in this drop-down menu. Alternatively, you can use tcode FB65 in SAP to post a vendor credit memo.
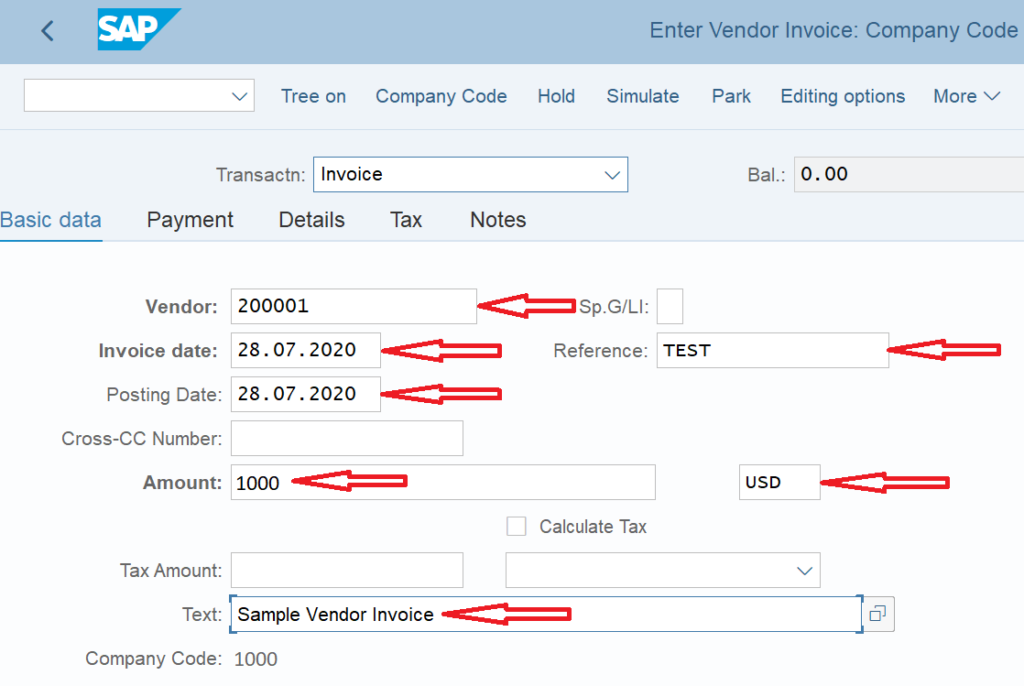
Coming back to the header data, you need to fill the following mandatory input fields:
- Vendor – Enter the Vendor Code for which you are creating an invoice. For example, I’m using vendor code 200001.
- Invoice Date – The date on which you want to create an invoice. I’m taking today’s date.
- Posting Date – The date on which the posting to the sub-ledger or a GL account takes place.
- Amount – Enter the amount that you are liable to pay to the vendor.
- Currency – Enter the currency in which the invoice is to be raised.
You can also make use of the Reference and Text optional fields to enter additional data or narration of the vendor invoice. Also, you can select the relevant input tax code if tax is applicable to the invoice. Since I’m creating a simple invoice without taxes, I have kept it blank.
Step 3: Enter the GL Details
So far, we have entered the vendor line item only. The next step is to enter the GL line items. Please note that you cannot post multiple vendor line items in FB60. To post multiple line items of a single vendor or line items of multiple vendors in the same invoice, you need to use FB01 in SAP.

Now, you can enter as many GL line items here in this enjoy transaction. I’m using only one offsetting GL line item to display the demo. In a vendor invoice, you create liability by crediting a vendor account. Similarly, you book expenses by debiting an expense account.
I have taken one expense account of 100100 which amounts to 1000 USD. Just like the vendor line item, you have an option to enter the Assignment and Text fields to capture the additional text or important information.

As you are already aware that you need to enter a cost center to post an accounting entry to an expense account. I have given the cost center for ‘Purchase Expenses’.

Now you have entered all the required input fields, it is important to check the status of the invoice. At the top of the screen, you can see the Balance value and the status indicator.
If you see a zero balance, it means that the debit amount matches the credit amount, and the document balances itself. Also, the green indicator means that the invoice is complete and you can post it without any issues.
On the other hand, if you see a positive balance and a red indicator, it means that the amounts are not matching and should be corrected before proceeding further.
Step 4: Simulate and Post the Vendor Invoice
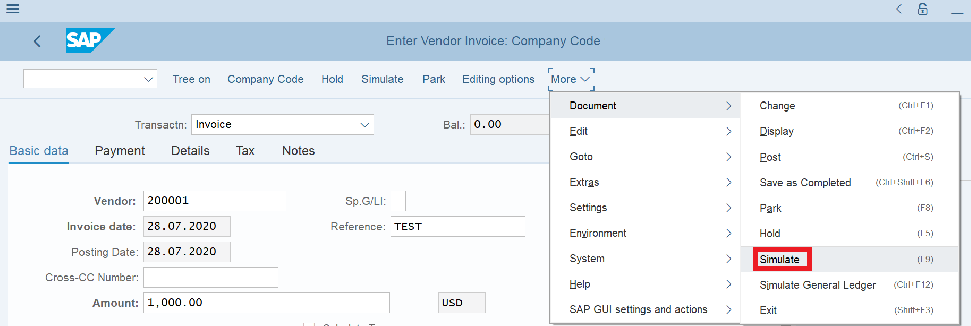
The last step to process in tcode FB60 in SAP is to simulate the document and then post it. Simulation helps in cross-checking the document before you post the accounting entry.
Click on the More navigation button at the top, then Document and Simulate.
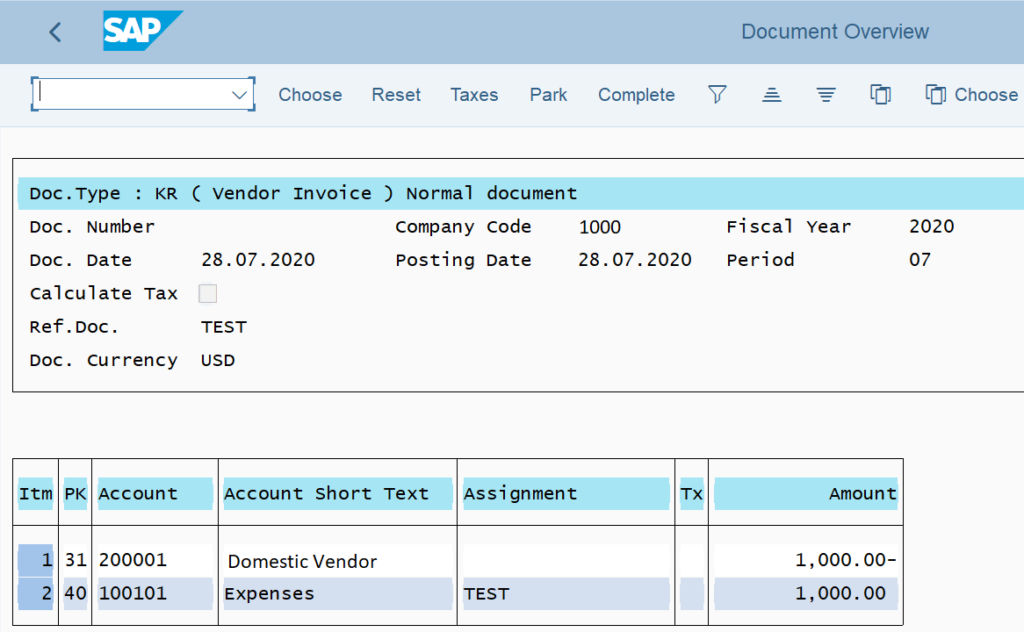
As a result, you will be able to see the accounting entry of the vendor invoice. You can quickly cross verify the details in the document. If there is any discrepancy, you can change the data by double-clicking the line item.
In case all the values are correct, you can post the document by clicking on the ‘Post‘ button or by pressing Ctrl+S on your keyboard. It will post an accounting entry in the system and will update the FB60 table in SAP.
At last, SAP will generate an accounting document number for the vendor invoice within company code 1000.

Optional Step: Display Vendor Invoice
This is an optional step to display the existing vendor invoice document. If you have posted a vendor invoice with reference to the Purchase order via MIRO in SAP, then it is recommended to use the tcode ME23N to display the purchase order and see the invoice details.
In other cases, where a vendor invoice has been posted using FB60 in SAP, then you can use the tcode FB03 to display the accounting document.
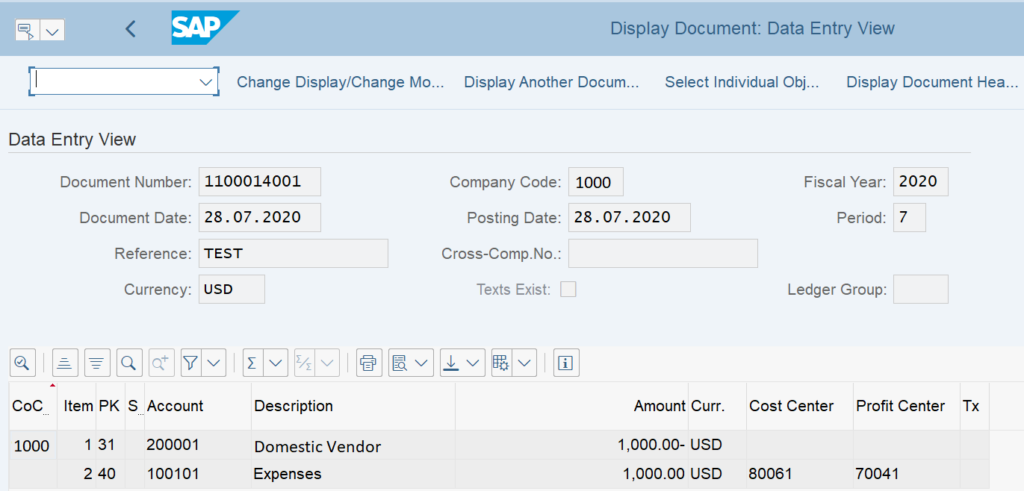
Execute the transaction code FB03 and enter the document number, company code, and fiscal year. Press enter and you can view the accounting entry of the vendor invoice.
FB60 Accounting Entry in SAP
The SAP system will generate the following FB60 accounting entry in SAP for a vendor invoice:
Vendor Account 1000 Cr.
Expense GL Account 1000 Dr.
FB60 Table in SAP
Once you have posted an accounting entry for a vendor invoice in SAP, it will be stored in the database tables. Earlier in the SAP ECC system, tables BSIK and BSAK along with BKPF and BSEG were used. But which is the FB60 table in SAP HANA?
Since the introduction of S/4 HANA, SAP makes use of universal ledger table ACDOCA to store the accounting entries. The tables BSIK and BSAK are obsolete now. You can also view the data in BKPF and BSEG tables.
Vendor Invoice in SAP: FAQ
What is the tcode for Non PO Invoice in SAP?
FB60 is the tcode to create a vendor invoice without a purchase order.
What is the difference between MIRO and FB60?
You use MIRO to create a vendor invoice with reference to a purchase order. It involves the inventory transfer. On the other hand, you use FB60 to create a vendor invoice directly in SAP FICO without any purchase order.
How Do I Reverse a FB60 Document in SAP?
Just like you reverse any accounting document via tcode FB08. If the FB60 invoice is already cleared, then you can use FBRA.
What is the difference between FB60 and F-43?
There are many to be precise. But the most important is that FB60 allows you to post only one line for a vendor whereas in F-43 you can post multiple vendor line items in a single invoice.
What is the FB60 table in SAP?
In S/4 HANA, the accounting entries for a FB60 Vendor invoice are stored in table ACDOCA.
I hope you liked this tutorial on FB60. Please do share it with others and stay tuned!!!


[…] you go through my previous posts, I have explained the different kinds of processes (FB60, FB70, F110, F-28, etc.) and their postings. But I have never talked about reversals. What are […]