F-03 in SAP: Perform Manual Clearing of GL Accounts
Hi Readers, I wish you a merry Christmas and a Happy New Year in Advance!
In this tutorial, I will demonstrate how you can use the tcode F-03 in SAP for the manual clearing of GL accounts. In my previous tutorial, I explained about F.13 is used for automatic clearing of open-item managed GL accounts. But like I had explained, automatic clearing is not the only option in SAP. You can also use manual clearing to clear the open-item managed GL Accounts.
But why do you need it? It’s simple, there may be circumstances when the business users will post manual reversal entries or adjustment entries to GL accounts. As you already know these on-account journal entries posts as an open item to a GL account. So, the business user needs to manually clear it using tcode F-03 in SAP.
As F.13 (Automatic Clearing) is most widely used for open-item managed GL Accounts that are also posted automatically by the system. For example, you do not post any manual entries to a GR/IR account. Rather you assign this GL account in the MM configuration and SAP automatically posts the entries to this account at the time of Goods Receipt and creating a vendor invoice.
But there are some GL accounts that are open-item managed and can also be posted manually. For example, Other Non-Current Assets. This GL account is an open-item managed account and you can also post adjustment or manual entries to this account. So, to clear such GL accounts, you can use F-03 in SAP. Let’s begin!!!
Table of Contents
F-03 in SAP: Manual Clearing of GL Accounts
In this tutorial, I will take the example of the ‘Other Non-Current Assets‘ GL account. This is an open-item managed account and users can also post manual entries to it. I have already posted a couple of adjustment entries to this GL account. Now, we will check the balances of this GL account in the GL report FBL3N.
Step 1: Display GL Open Items in FBL3N
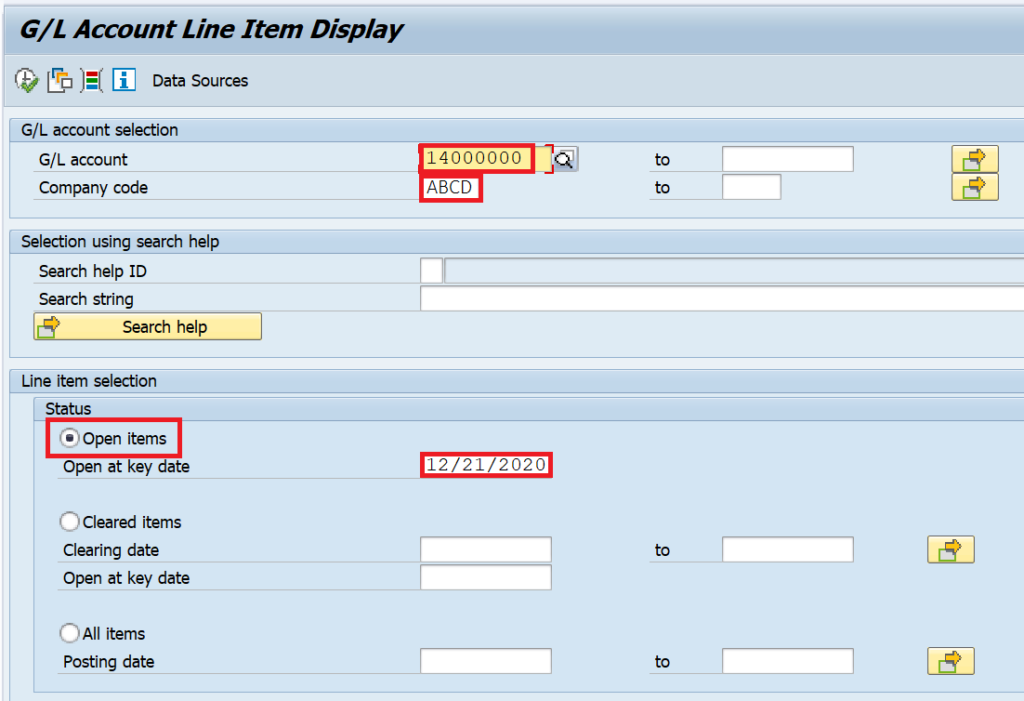
To display the existing open items of this GL account, execute the transaction FBL3N. This report can show the open items as well as the cleared items of any GL account. Since in this example, I’m taking Other Non-Current Assets GL Account, the GL code for the same is 14000000. In the selection screen, enter this GL code and the company code. And, select the ‘Open Items‘ radio button and enter the date till which you want to display the open items.
I have entered 21st December 2020 as the date till which I want to see the open items for this GL account. After entering all the details, execute the report.
After executing the report, you will see all the open items for the GL account. For example, in the screenshot given below, you can see that there are 2 open items. Both the open items have the same amount of 1000 euros but one has a debit amount and the other one has a credit amount. Overall, even if there are 2 open line items but the total outstanding is zero.

Step 2: Execute F-03 in SAP for Manual Clearing of GL Accounts
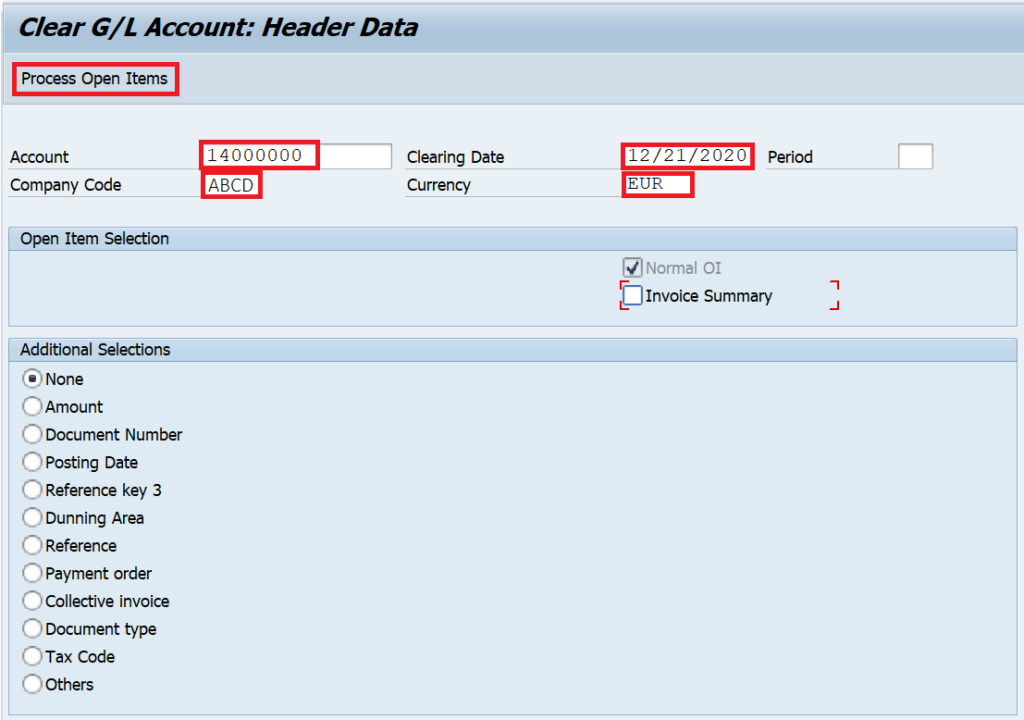
Now, since both the open items have the same amount and opposite posting indicators (Debit & Credit), it can be cleared manually. Execute the tcode F-03 in SAP to initiate the process of manually clearing the GL open items. The selection screen of F-03 is different as compared to F.13 transaction. In F.13, you have an option to automatically clear the GL account, Customer, and Vendor accounts. But in this case, you can manually clear GL accounts only. For manual clearing of customers or vendors, you need to use separate transactions F-32 and F-44 respectively.
In the selection screen, enter the GL account code that you want to clear, clearing date (the date on which clearing takes place), company code, and Currency. In the Additional Selections section, you have a provision to select the option based on which you can clear the open items. For example, if you select the ‘Amount’ option and then enter the amount as 1000 euros, then the system will only show the open items with the same amount.
Similarly, if you select the option ‘Document Type’ and then provide the document type as SA, then the system will only display the open items having document type SA. Then, you can clear it. In case you want to display all the open items, then you can select the option ‘None’ and then click on the ‘Process Open Items‘ button.
Step 3: Select the Open Items for Clearing
After that, you should be able to see all the open items of this GL account. By default, all the line items are activated. This can be seen as the amount is in blue color. In my example, I have only 2 line items and I want to clear both, so I will keep both of them activated.
But in case, if there are 3 open items and you want to clear only 2 of them, then you need to first deactivate all the 3 line items and then activate only those line items that you want to clear. This can be done by clicking on the ‘Select all‘ button and then ‘Deactivate Items‘.
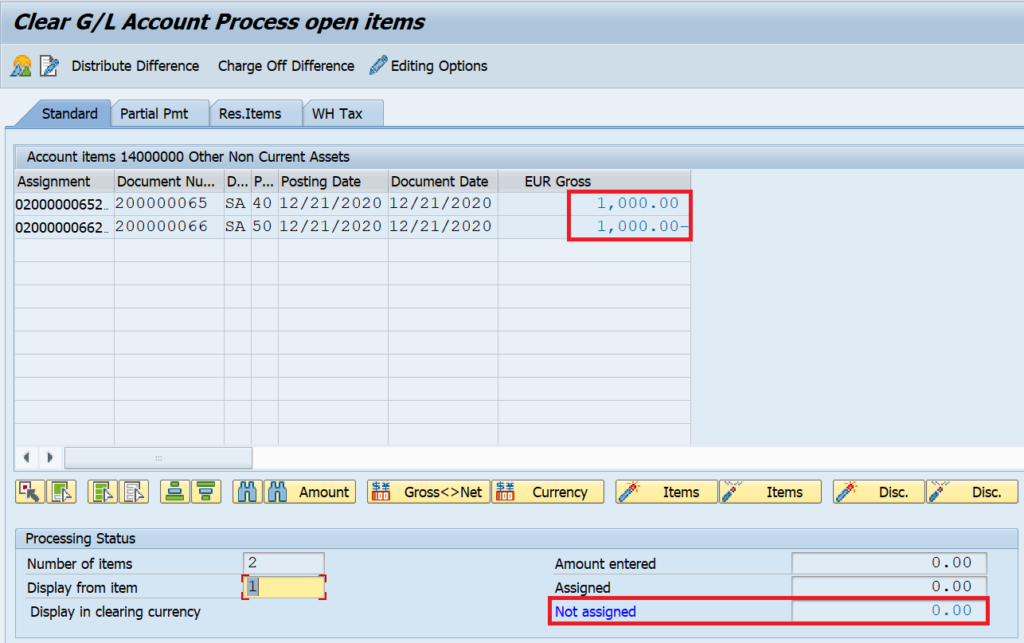
After selecting the open items for clearing, click on the ‘Post‘ button to post the clearing document. This clearing document will contain information about the clearing of the open items.

Step 4: Display the Cleared Items in FBL3N
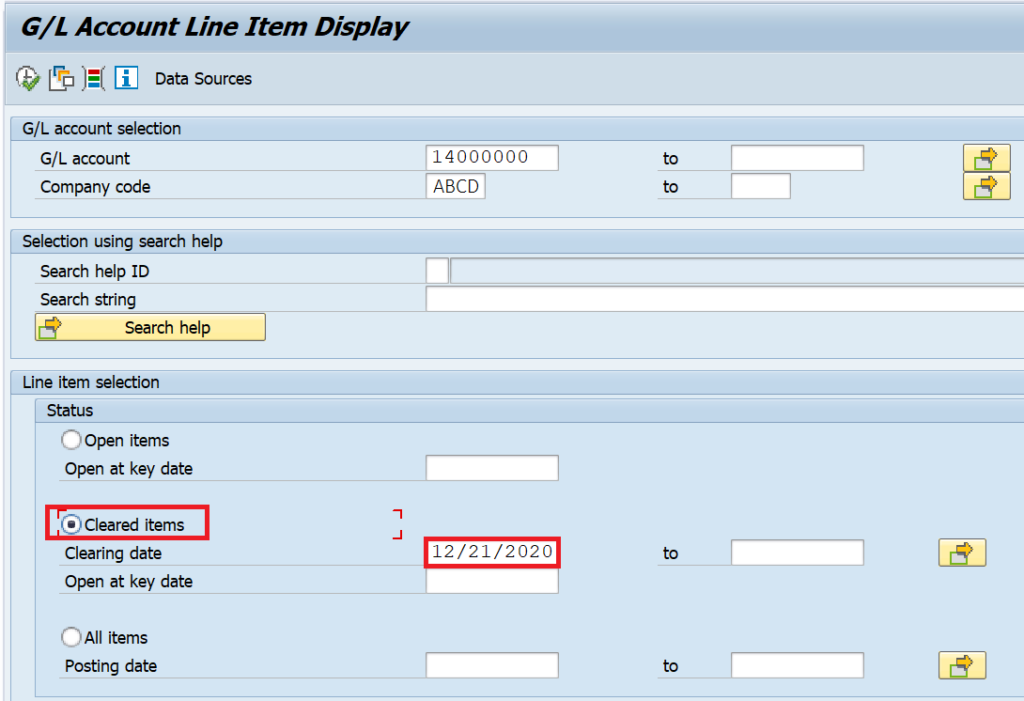
Again, you need to execute the FBL3N report to display the GL balances. Enter the GL code and the company code on the selection screen. Instead of selecting the Open Items option, select the Cleared Items and enter the clearing date. Execute the report and it will display both the open items that have been cleared successfully along with the clearing document.

F-03 in SAP: FAQs
What is GL Clearing?
A clearing is a process of clearing the GL open items. The clearing can be manual or automatic.
How do you manually clear a GL account?
Once you have open items in a GL account, you can manually clear it by using transaction F-03.
What is the difference between F-03 and F.13?
F-03 is used for manual clearing whereas F.13 is used for automatic clearing.
How do you post manual clearing in SAP?
In SAP, a manual clearing can be posted by using F-03 (GL Clearing), F-32 (Customer Clearing), and F-44 (Vendor Clearing).
That’s it! I hope this tutorial brought some new learning for you. Also, please keep following this blog for more detailed tutorials! Until Next Time, Ciao!


